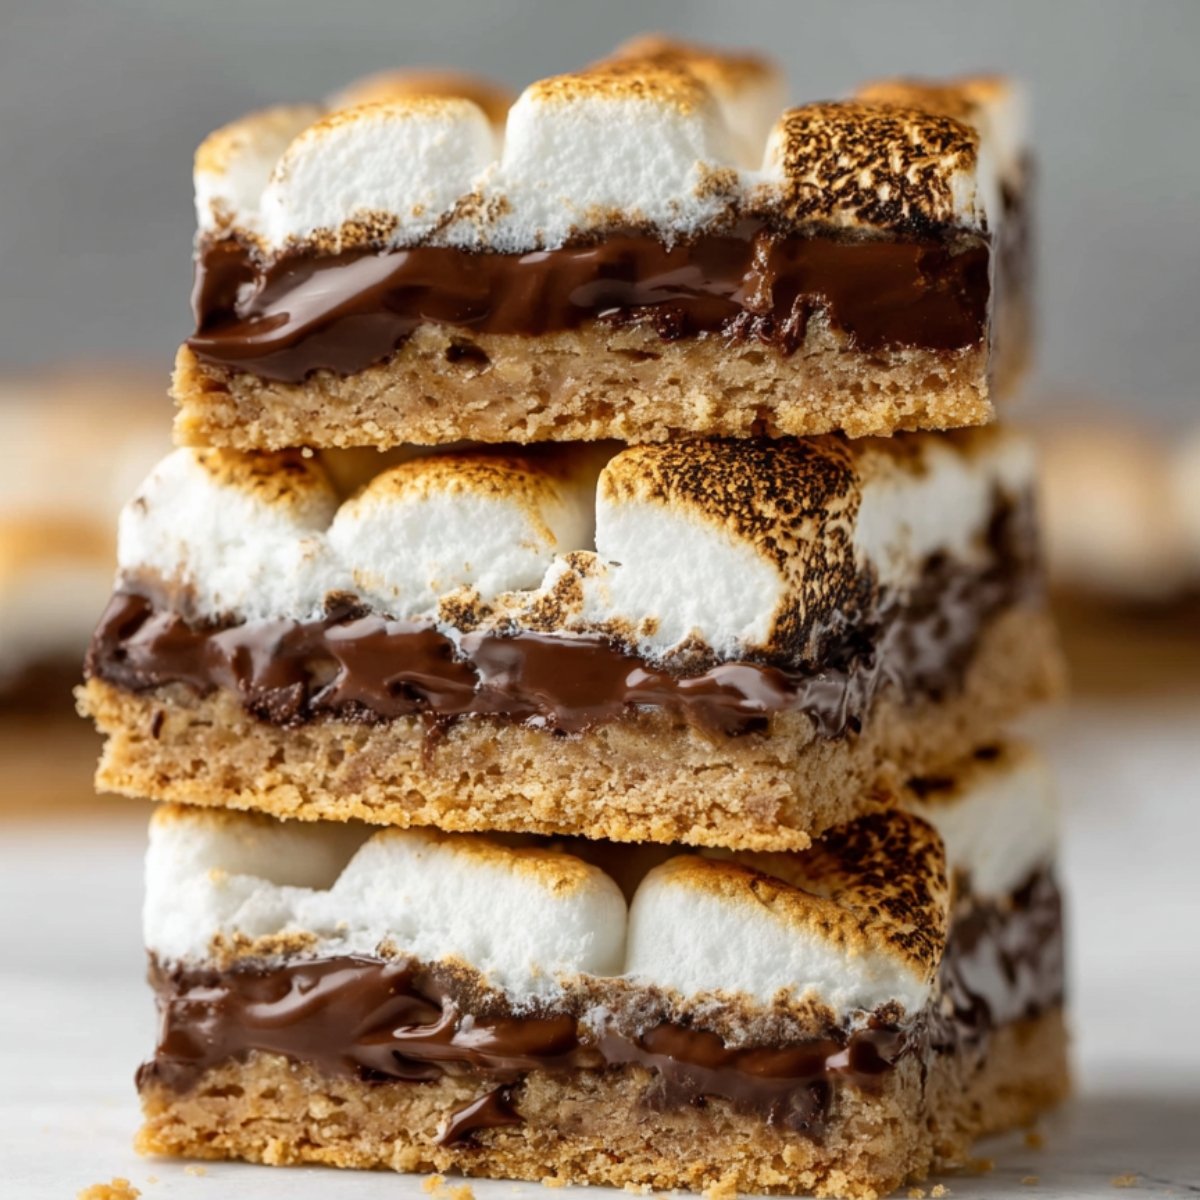
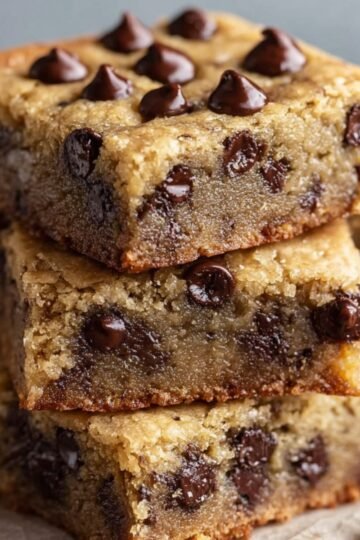
These S'mores Bars are loaded with gooey chocolate, toasted marshmallows, and a buttery graham cracker crust that holds everything together in one decadent, sticky square. I made these for a summer potluck years ago when I wanted the flavor of campfire s'mores without the hassle of building a fire, and they disappeared faster than any dessert I've ever brought. The marshmallows get golden and toasty under the broiler, the chocolate melts into a silky layer, and the crust stays crisp and buttery underneath.
If you're looking for more crowd-pleasing treats, you might also love my Cheesy Garlic Pull Apart Bread for savory gatherings or this comforting Tomato Bisque Soup for cozy nights.
Why You will Love This Recipe
These S'mores Bars are ridiculously easy to make. You don't need any special skills or fancy equipment. If you can press a crust into a pan and watch marshmallows broil for two minutes, you can make these.
The crust is buttery and sweet with a hint of powdered sugar that makes it melt-in-your-mouth good. The chocolate layer is thick and rich, made from classic Hershey bars that bring that authentic s'mores flavor. And the marshmallows on top get toasted just right, with golden brown spots and a gooey, stretchy texture that makes every bite feel indulgent.
I also love that these are endlessly customizable. You can use different types of chocolate, add peanut butter cups, sprinkle on some sea salt, or even swap the marshmallows for marshmallow fluff. They're the kind of recipe that invites experimentation.
Jump to:
S'mores Bars Ingredients
Here's everything you'll need to make these chocolate marshmallow bars from scratch.
See Recipe Card Below This Post For Ingredient Quantities
- Graham cracker crumbs: These form the base of the crust and give you that classic s'mores flavor. You can buy pre-made crumbs or crush your own graham crackers in a food processor or zip-top bag with a rolling pin.
- Melted butter: Binds the graham cracker crumbs together and adds richness. The amount can vary depending on how moist your crumbs are, so start with 8 tablespoons and add more if needed. The mixture should hold together when pressed but not be greasy or pooling.
- Powdered sugar: Sweetens the crust and gives it a softer, more melt-in-your-mouth texture. It also helps the crust hold together without being too dense.
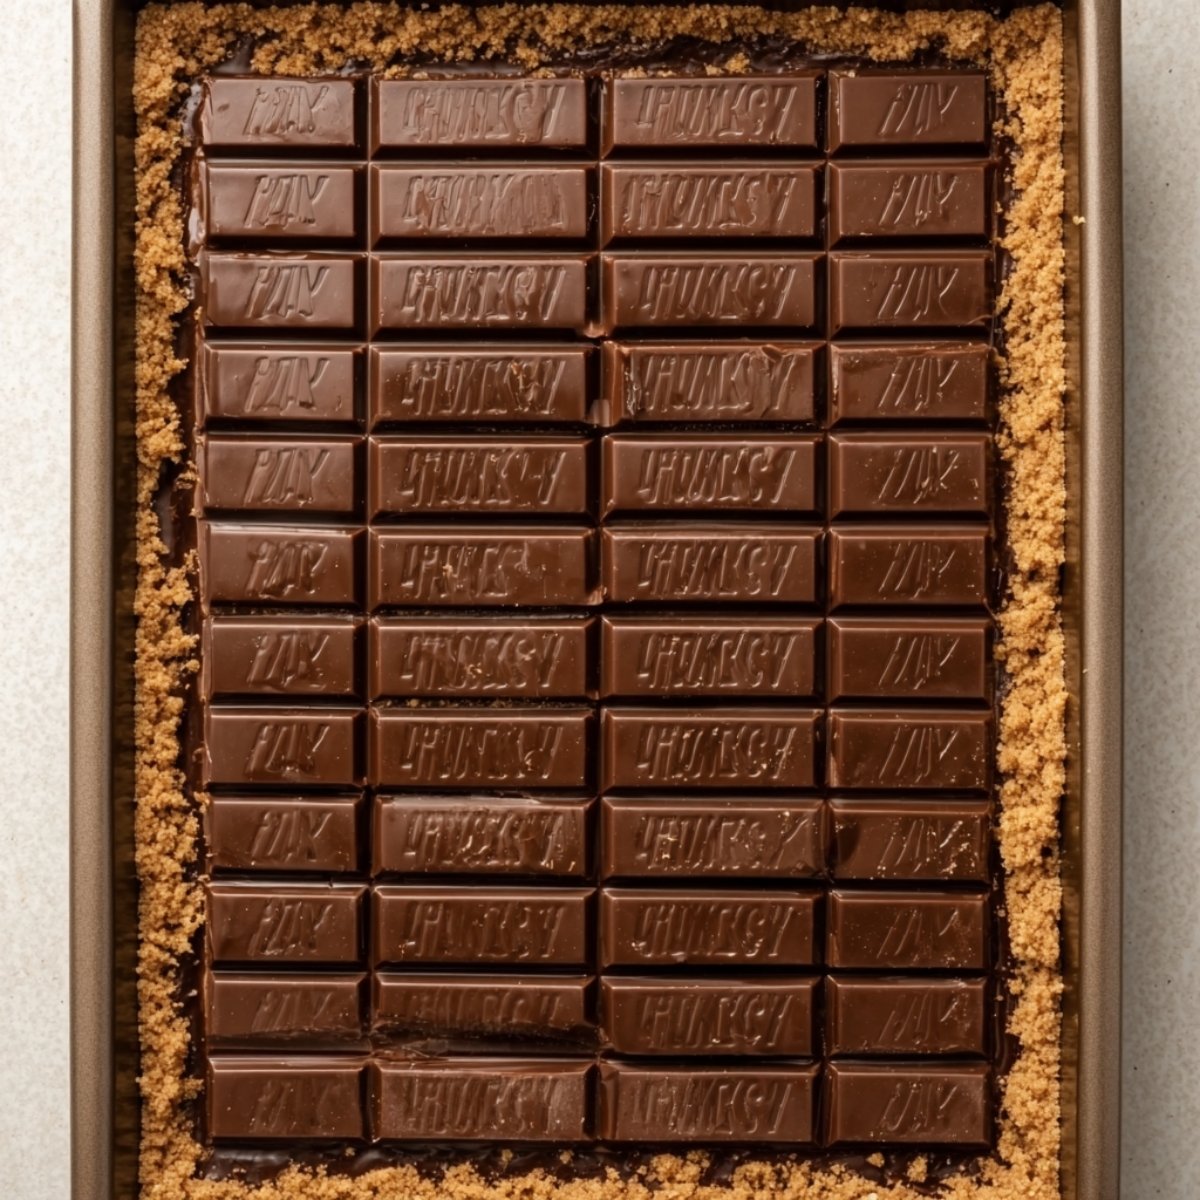
- Hershey chocolate bars: Classic milk chocolate bars are traditional and taste just like campfire s'mores. You'll need four of the 4.4 oz bars to cover the whole pan evenly.
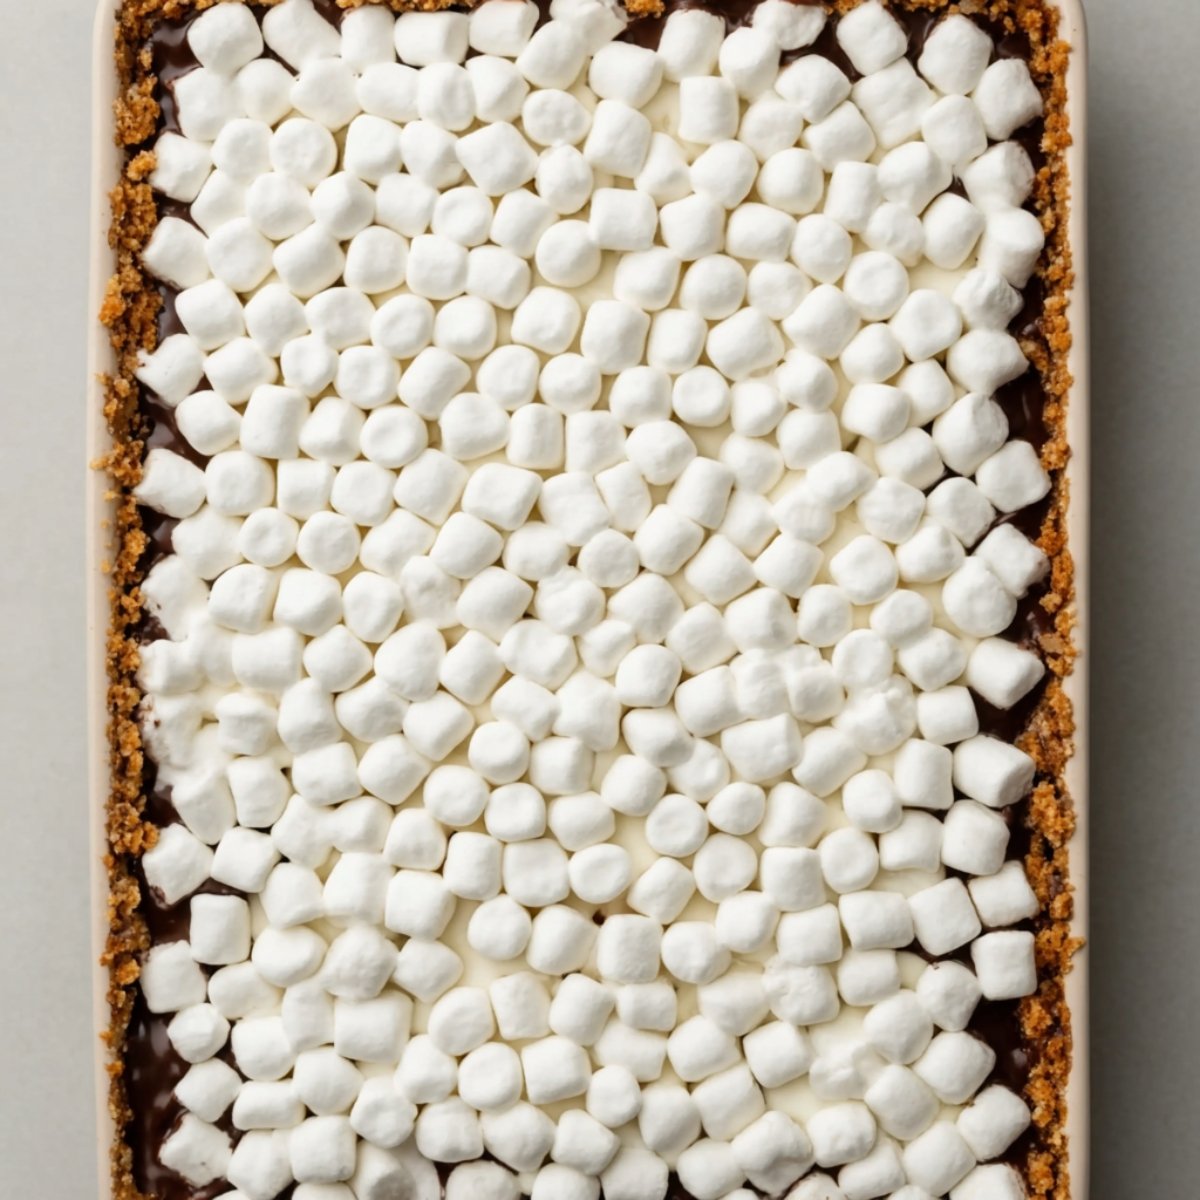
- Mini marshmallows: These toast up quickly and evenly under the broiler. Mini marshmallows work better than large ones because they pack together more tightly and create a uniform layer.
HOW TO MAKE S'mores Bars
These S'mores Bars come together quickly with just a few simple steps.
- Preheat oven and prepare pan: Preheat your oven to 350°F. Grease a 9x13 baking pan generously with non-stick butter spray or line it with parchment paper for easy removal. Make sure to get the corners and edges well.
- Make the crust: In a medium bowl, stir together the graham cracker crumbs and powdered sugar. Add 8 tablespoons of melted butter and mix with a fork or spoon until the mixture looks like wet sand. It should hold together when you press it between your fingers but not look greasy or have butter pooling at the bottom. If it's too dry and crumbly, add another tablespoon or two of melted butter until it reaches the right consistency. Press the mixture firmly and evenly into the bottom and up the sides of the prepared pan. Use the bottom of a measuring cup or your hands to pack it down tight.
- Bake crust: Bake the crust for 5 to 8 minutes, just until the edges start to turn lightly golden. You don't want it too dark since it will bake more later. Remove from the oven and let it cool for a minute or two.
- Add chocolate: While the crust is still warm, break the Hershey bars into individual pieces and lay them evenly over the entire surface of the crust, edge to edge. You want full chocolate coverage. Place the pan back in the oven and bake for about 3 minutes, just until the chocolate softens and starts to look shiny and melty. Don't leave it in too long or the chocolate will bubble. Remove from the oven and let it cool for 1 to 2 minutes so the chocolate firms up slightly and doesn't mix with the marshmallows.
- Add marshmallows: Sprinkle the mini marshmallows over the chocolate layer, packing them close together so there are no gaps. You want a thick, even layer that covers all the chocolate.
- Broil marshmallows: Switch your oven to the broil setting. Place the pan back in the oven on the top rack and watch it like a hawk. This step happens fast. Broil for about 1 to 2 minutes, just until the tops of the marshmallows turn golden brown with those beautiful toasted spots. They can go from perfect to burnt in seconds, so don't walk away. As soon as they're toasted to your liking, pull the pan out immediately.
- Cool and set: Let the bars cool completely at room temperature. For cleaner cuts and easier handling, pop the pan in the fridge for 10 to 15 minutes to firm everything up.
- Slice and serve: Use a sharp knife warmed under hot water to cut the bars into 16 squares. Wipe the knife clean and warm it again between cuts if the marshmallows start sticking. This keeps the cuts clean and prevents the layers from smooshing together.
Substitutions and Variations
These S'mores cookie bars are easy to customize based on what you have or what you're craving.
Use dark chocolate: Swap the Hershey bars for dark chocolate bars if you prefer a less sweet, more intense chocolate flavor. It's a nice contrast to the sweet marshmallows.
Add peanut butter: Spread a thin layer of creamy peanut butter over the chocolate before adding the marshmallows for a peanut butter s'mores twist.
Use Golden Grahams cereal: For S'mores bars with Golden Grahams, crush about 4 cups of Golden Grahams cereal to use in place of the graham cracker crumbs. It adds a slightly different texture and flavor.
Try flavored marshmallows: Use strawberry, vanilla, or chocolate marshmallows for a fun flavor twist.
Add a drizzle: After the bars cool, drizzle melted chocolate or caramel over the top for extra decadence.
Make them gluten-free: Use gluten-free graham crackers or cookies to make the crust.
Add mix-ins: Sprinkle chocolate chips, crushed pretzels, or chopped nuts over the chocolate layer before adding the marshmallows.
Equipment
You don't need much to make these gooey chocolate treats.
9x13 baking pan: A standard 9x13 inch metal or glass baking pan works perfectly. Metal heats more evenly, but glass works fine too.
Medium mixing bowl: For mixing the crust ingredients together.
Spoon or spatula: For stirring the crust mixture and pressing it into the pan.
Oven with broil function: Essential for toasting the marshmallows. Most ovens have a broil setting on the top rack.
Sharp knife: For cutting the bars once they've cooled. Warming the knife under hot water helps keep the cuts clean.
Storage and Reheating Tips
These bars store well and stay delicious for days.
Room temperature: Store the bars in an airtight container at room temperature for up to 3 days. The marshmallows will stay soft, but the crust might lose a bit of its crispness.
Refrigerator: For longer storage, keep them in an airtight container in the fridge for up to 5 days. The bars will firm up and be easier to handle, but let them sit at room temperature for a few minutes before serving so the chocolate softens slightly.
Freezing: Yes, you can freeze these! Wrap individual bars in plastic wrap, then place them in a freezer-safe bag or container. Freeze for up to 2 months. Thaw at room temperature for about 30 minutes before eating.
Make-ahead: You can make these a day ahead and store them covered at room temperature. They're actually easier to cut when they've had time to set completely.
Serving Suggestions
These S'mores Bars are perfect on their own, but here are a few fun ways to serve them.
With ice cream: Serve a warm bar with a scoop of vanilla ice cream on the side. The cold ice cream against the warm, gooey bar is incredible.
At parties: Cut them into smaller squares for bite-sized treats at parties, potlucks, or bake sales. They're easy to grab and eat with your hands.
With coffee: Pair them with a hot cup of coffee or a glass of cold milk for the ultimate dessert experience.
As a campfire alternative: Bring these to your next outdoor gathering instead of making traditional s'mores. They're less messy and everyone gets a perfect piece.
Expert Tips
These little tricks will help you nail this recipe every time.
Don't over-butter the crust: Start with less butter and add more if needed. Too much butter makes the crust greasy and it won't hold together well.
Press the crust firmly: Really pack that crust down into the pan so it holds together when you cut the bars. Use the bottom of a measuring cup to get it nice and compact.
Watch the broiler closely: Marshmallows go from golden to burnt in seconds under the broiler. Stay right there and watch them the whole time.
Let the chocolate cool slightly: After melting the chocolate, let it cool for a minute or two before adding the marshmallows. This prevents the marshmallows from melting into the chocolate.
Use a hot knife: Warming your knife under hot water before cutting makes all the difference. It slices through the marshmallows and chocolate cleanly without dragging or smooshing.
Chill before cutting: If the bars are too soft to cut cleanly, pop the whole pan in the fridge for 10 to 15 minutes. This firms everything up and makes cutting much easier.
Line the pan with parchment: For the easiest cleanup and removal, line your pan with parchment paper, leaving an overhang on two sides. Once the bars are set, you can lift the whole thing out and cut it on a cutting board.
FAQ
Yes! S'mores Bars are great for making ahead. You can prepare them up to a day in advance and store them covered at room temperature or in the fridge. If you refrigerate them, let them sit at room temperature for about 10 minutes before serving so the chocolate softens up a bit. They actually cut more cleanly when they've had time to set completely, so making them ahead can actually make your life easier.
Absolutely! Dark chocolate works beautifully in these bars if you prefer a richer, less sweet flavor. The bittersweet chocolate balances out the sweetness of the marshmallows and graham crackers. You can also try milk chocolate chips, semi-sweet chocolate, or even white chocolate if you want to mix things up. Just make sure whatever chocolate you use can melt smoothly and evenly.
The key is to watch them closely and keep the oven rack in the right position. Place your pan on the top rack under the broiler, but not too close to the heating element. Stay right there and watch the marshmallows the entire time they're broiling. As soon as you see golden brown spots forming, pull the pan out immediately. It usually takes only 1 to 2 minutes. If your broiler runs hot, you can also broil on a lower rack or crack the oven door slightly to reduce the heat. If you're looking for other easy dessert ideas, try my Creamy Chicken Poblano Soup or Pasta Primavera for savory comfort food instead.
Yes, these bars freeze really well! Let them cool completely, then cut them into individual squares. Wrap each bar tightly in plastic wrap, then place them all in a freezer-safe bag or container. They'll keep in the freezer for up to 2 months. When you're ready to eat them, thaw at room temperature for about 30 minutes. The texture stays great, and they're just as gooey and delicious as when you first made them.
Related
Looking for other recipes like this? Try these:

Pairing
These are my favorite dishes to serve with S'mores Bars


S’mores Bars
Ingredients
Method
- Preheat the oven to 350°F and grease a 9×13-inch pan with non-stick spray.
- In a medium bowl, combine graham cracker crumbs, powdered sugar, and melted butter. Mix until the crumbs are evenly moistened.
- Press the crumb mixture firmly into the bottom and slightly up the sides of the pan to form an even crust.
- Bake the crust for 5–8 minutes, until the edges are lightly golden. Remove from oven and allow to cool slightly.
- Lay the chocolate bars evenly over the warm crust, covering it as completely as possible.
- Return the pan to the oven for 3 minutes, until the chocolate begins to soften and glisten. Remove and let cool 1–2 minutes.
- Spread mini marshmallows evenly over the melted chocolate, packing them close together.
- Set oven to broil. Place pan under the broiler for 1–2 minutes, watching constantly, until marshmallows are golden brown. Remove immediately to prevent burning.
- Allow bars to cool completely. For firmer bars, refrigerate before cutting.
- Cut into 16 pieces using a sharp knife; for sticky marshmallows, warm the knife under hot water and dry it before slicing.
Leave a Reply