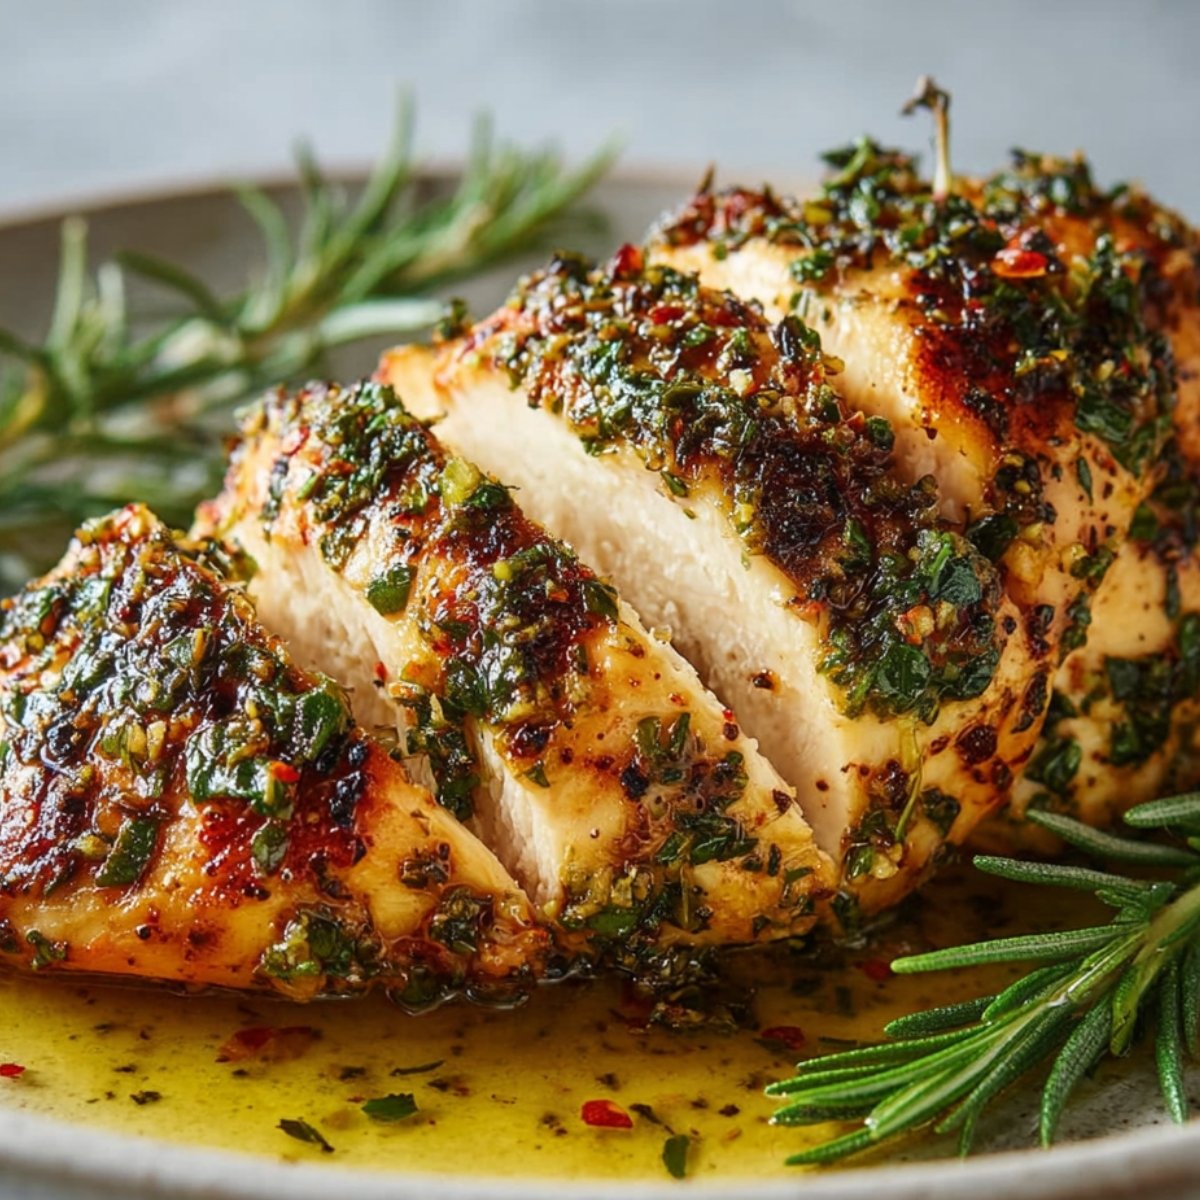
This garlic butter baked chicken breast comes out juicy, tender, and golden every single time, with melted butter pooling around the edges and garlic clinging to every bite. I used to struggle with dry, rubbery chicken until I started using this method, and now it's the easiest weeknight dinner I make. It takes just 25 minutes from start to finish, uses ingredients you already have, and works beautifully for meal prep or feeding a crowd.
If you're looking for more simple chicken dinners, try my Garlic Parmesan Chicken and Potatoes or this Street Corn Chicken Bowl for another quick win.
Why You will Love This Garlic Butter Baked Chicken Breast
This oven-baked juicy chicken breast recipe is foolproof. The secret is searing the chicken first to lock in moisture, then finishing it in the oven with a garlicky butter sauce that keeps everything tender and flavorful. You get perfectly cooked chicken with a golden crust and none of that dry, bland texture that usually comes with baked chicken breasts. It's a simple chicken dinner idea that works for busy weeknights, Sunday meal prep, or anytime you need protein that's ready fast and tastes great. Plus, it only dirties one skillet, so cleanup is a breeze.
Jump to:
Garlic Butter Baked Chicken Breast Ingredients
Here's what you'll need for this simple, flavorful chicken.
See Recipe Card Below This Post For Ingredient Quantities
- Skinless chicken breasts: The base of the recipe. Look for chicken breasts that are roughly the same size so they cook evenly.
- Salt and black pepper, to taste: Essential for bringing out the natural flavor of the chicken and balancing the richness of the butter.
- Paprika, divided: Adds a subtle smoky sweetness and a beautiful golden color. Half goes on the chicken, and the rest goes into the garlic butter.
- Butter, melted: This is what makes the chicken so tender and flavorful. The butter melts into the pan and coats every bite with richness.
- Italian seasoning: A blend of herbs like basil, oregano, and thyme that adds depth and a hint of Mediterranean flavor.
- Fresh parsley, chopped: Brightens up the dish and adds a pop of color. Fresh parsley tastes so much better than dried.
- Garlic, minced: The star of the garlic butter. Fresh garlic gives the sauce a sweet, fragrant punch that dried garlic can't match.
- Extra virgin olive oil: Used for searing the chicken. It has a high enough smoke point to get a good crust without burning.
HOW TO MAKE Garlic Butter Baked Chicken Breast
Follow these steps for perfectly juicy, garlicky chicken every time.
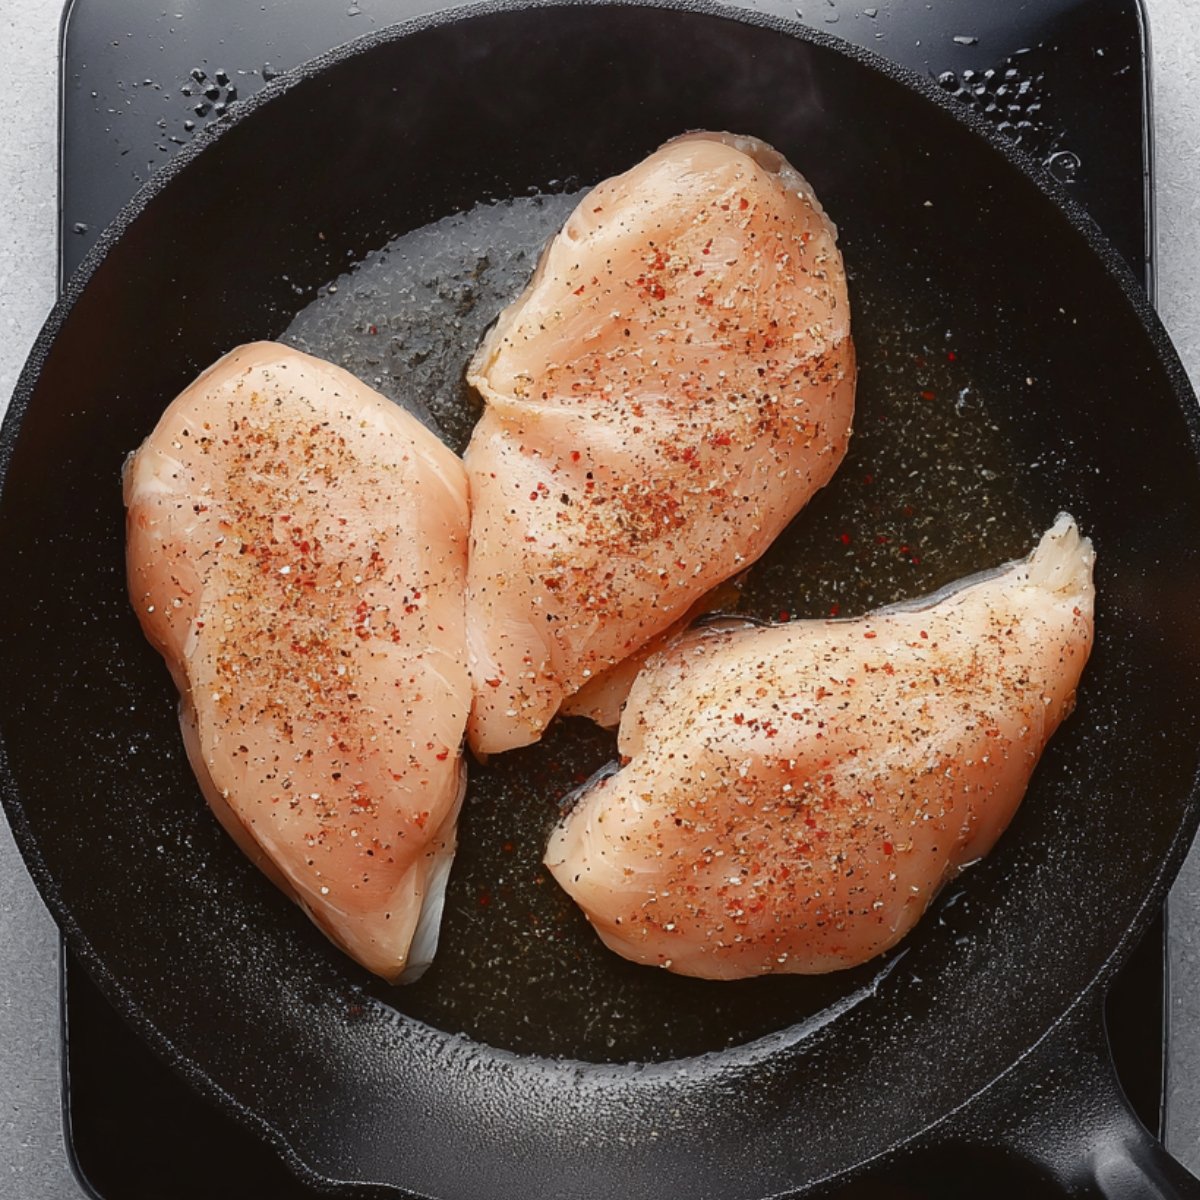
- Preheat Oven & Season Chicken: Preheat your oven to 400°F so it's nice and hot when the chicken goes in. Season the chicken breasts on both sides with salt, pepper, and ½ teaspoon of the paprika. This simple seasoning base helps the chicken develop flavor before it even hits the pan.
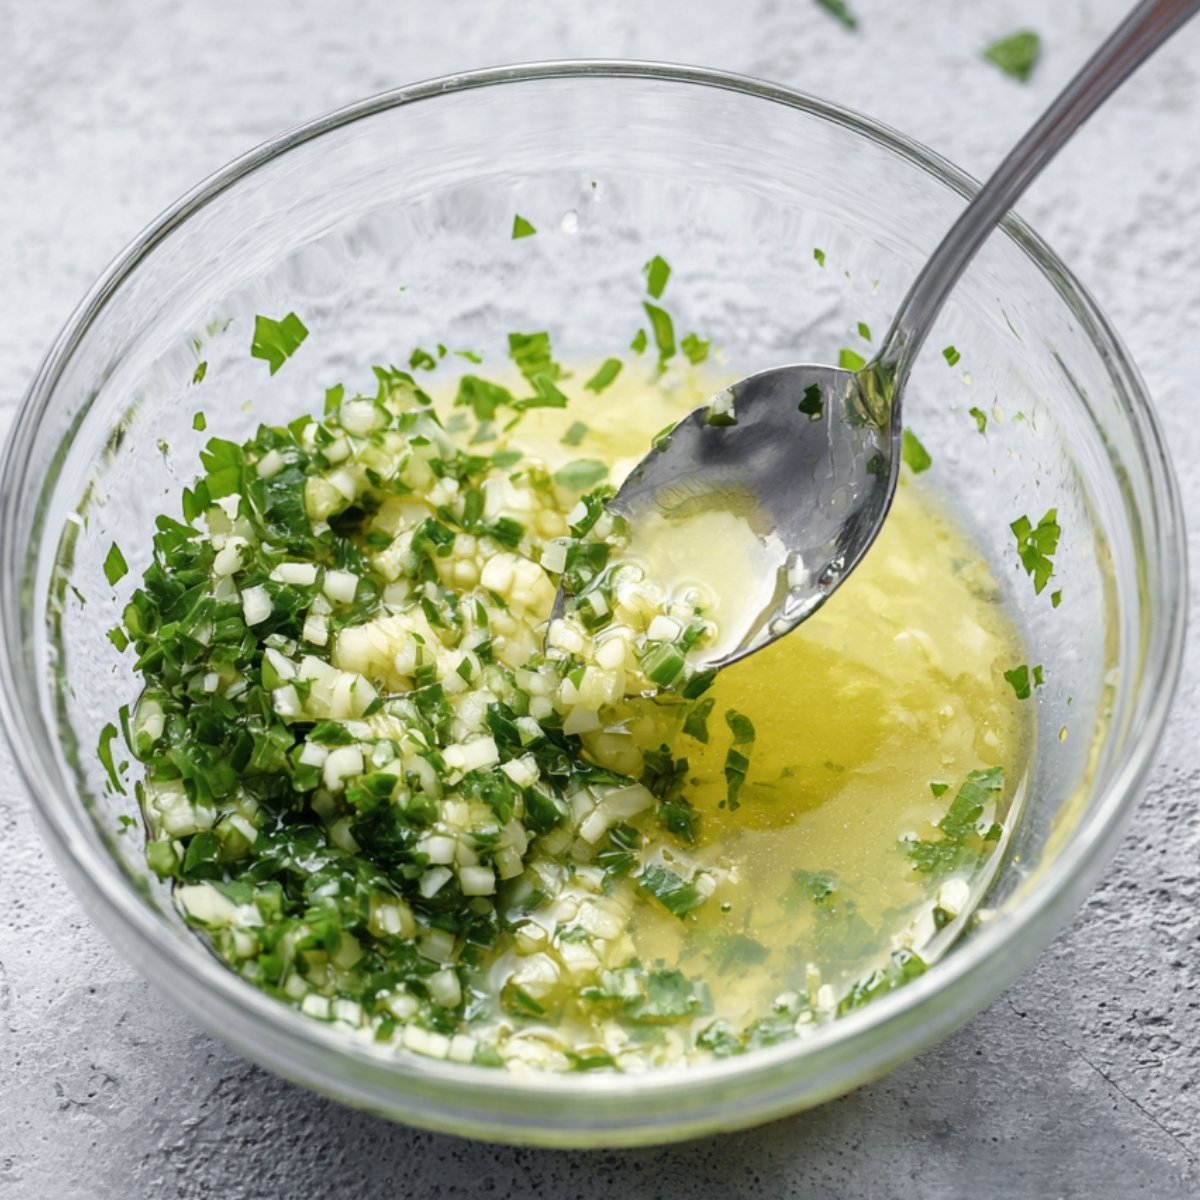
- Prepare Garlic Butter: In a small bowl, mix the remaining ¼ teaspoon of paprika with the melted butter, Italian seasoning, chopped parsley, and minced garlic. Stir it all together until it's well combined and fragrant. Set the bowl aside while you sear the chicken.
- Sear Chicken: Heat the olive oil in a cast iron skillet over medium heat. Once the oil is shimmering, add the chicken breasts and let them sear for 1 to 2 minutes per side until they turn golden brown. You're not cooking them all the way through yet, just building a nice crust and locking in the juices.
- Bake with Garlic Butter: Pour the prepared garlic butter mixture over the seared chicken, making sure each piece gets coated. Transfer the skillet directly to the oven and bake for approximately 20 minutes, or until the chicken reaches an internal temperature of 165°F. If you have a meat thermometer, use it to check the thickest part of the breast.
- Finish & Serve: Remove the skillet from the oven and spoon the remaining garlic butter from the pan over the chicken to give it an extra glossy coating. Garnish with additional fresh parsley or herbs if you like. Serve immediately while the chicken is hot and juicy.
Substitutions and Variations
- Use bone-in or skin-on chicken: If you prefer bone-in, skin-on chicken breasts, this recipe works great. Just increase the baking time to 30 to 35 minutes and check the internal temperature.
- Add lemon: Squeeze fresh lemon juice over the chicken before serving for a bright, tangy finish.
- Swap the herbs: Try fresh thyme, rosemary, or basil instead of Italian seasoning for a different flavor profile.
- Make it spicy: Add a pinch of red pepper flakes or cayenne to the garlic butter for a little heat.
- Use chicken thighs: Boneless, skinless chicken thighs work beautifully here and are even more forgiving if you accidentally overcook them.
Equipment
- Cast iron skillet: Retains heat beautifully and goes straight from stovetop to oven without any fuss. A heavy oven-safe skillet works too.
- Small mixing bowl: For whisking together the garlic butter mixture.
- Oven: Preheated to 400°F for even cooking.
- Spoon for basting: Use this to drizzle the garlic butter over the chicken before and after baking.
- Meat thermometer (optional but recommended): Takes the guesswork out of knowing when the chicken is done. You're looking for 165°F.
Storage and Reheating Tips
Let the chicken cool completely, then store it in an airtight container in the fridge for up to 4 days. Glass containers work best because they don't absorb odors or stains. To freeze, slice or shred the chicken first, then store it in a freezer-safe container or bag for up to 3 months. When you're ready to reheat, microwave individual portions with a damp paper towel placed over the container to keep the chicken moist. You can also reheat gently in a skillet over low heat with a splash of water or broth to bring back some of that juiciness.
Serving Suggestions
This garlic butter chicken recipe is versatile and pairs well with just about anything. Here are a few ideas:
- Serve it over a bed of rice or mashed potatoes to soak up all that garlicky butter.
- Pair it with roasted vegetables like broccoli, green beans, or Brussels sprouts for a balanced meal.
- Slice it up and toss it into a Caesar salad or grain bowl for a lighter option.
- Serve it alongside pasta tossed with olive oil and Parmesan for a simple, comforting dinner.
Expert Tips
- Don't skip the searing step: Searing the chicken first creates a flavorful crust and helps lock in moisture. It's a quick step that makes a big difference.
- Use a meat thermometer: Chicken breasts can be tricky, and the last thing you want is to overcook them. A thermometer takes the guesswork out and ensures you hit 165°F every time.
- Let the chicken rest: After you take it out of the oven, let the chicken rest for a few minutes before slicing. This helps the juices redistribute so every bite is moist and tender.
- Baste generously: Don't be shy with the garlic butter. Spoon it over the chicken before and after baking for maximum flavor.
- Choose similar-sized chicken breasts: This ensures they all cook at the same rate. If one is much thicker than the others, consider pounding it to an even thickness.
FAQ
Yes, you can absolutely use skin-on chicken breasts. The skin will get crispy and golden in the oven, and it adds extra flavor. Just make sure to sear the chicken skin-side down first to get a nice, crispy texture. You may need to bake it a little longer, so check the internal temperature to make sure it reaches 165°F. My mom always says skin-on chicken is more forgiving because the skin helps keep the meat moist.
The key is not overcooking it. Use a meat thermometer to check for 165°F, and take the chicken out of the oven as soon as it hits that temperature. Searing the chicken first also helps lock in moisture, and baking it with the garlic butter keeps it from drying out. If you're worried, err on the side of slightly underbaking and let it rest for a few minutes, it'll finish cooking with the residual heat.
You can prep the garlic butter mixture ahead of time and store it in the fridge for up to 2 days. You can also season the chicken in advance and keep it covered in the fridge until you're ready to cook. Once the chicken is cooked, it stores well and makes great meal prep for the week. Just reheat it gently so it doesn't dry out.
Yes, cooked chicken freezes really well. Let it cool completely, then slice or shred it before freezing. Store it in a freezer-safe bag or container for up to 3 months. When you're ready to use it, thaw it in the fridge overnight and reheat gently. Freezing it in portions makes it easy to grab just what you need for lunches or quick dinners.
Related
Looking for other recipes like this? Try these:


Pairing
These are my favorite dishes to serve with Garlic Butter Baked Chicken Breast

Garlic Butter Baked Chicken Breast
Ingredients
Method
- Preheat your oven to 400°F (205°C). Season the chicken breasts with salt, black pepper, and ½ teaspoon paprika.
- In a small bowl, combine the melted butter, remaining ¼ teaspoon paprika, minced garlic, Italian seasoning, and chopped parsley. Set aside.
- Heat the olive oil in a cast iron skillet over medium heat. Add the chicken breasts and sear until golden brown, about 1–2 minutes per side.
- Pour the garlic butter mixture over the chicken breasts. Transfer the skillet to the preheated oven and bake until the internal temperature reaches 165°F, about 20 minutes.
- Remove the skillet from the oven. Spoon some of the garlic butter from the pan over the chicken and garnish with additional fresh parsley if desired. Serve immediately.

Leave a Reply